Tag Archives: womens softball

Fundamentals of Catching: Part 1 Blocking

As a catcher myself and training throughout the years this is one skill that has been to me an after thought to many catchers and coaches. Although, It’s unrealistic to expect a pitcher to throw a perfect strike every pitch, and in some situations, the pitch might be out of the strike zone on purpose. As such, it’s crucial for every catcher to be skilled in blocking. When a ball is in the dirt, you only have one job: Prevent the ball from getting past you. But don’t let this responsibility daunt you.

Catching might not by glorious or popular, but in my opinion it’s the most important spot on the field. If a catcher can’t catch, the pitcher can’t pitch, and it all starts with proper blocking technique. So take the following tips to heart and you’ll be unstoppable behind the plate.

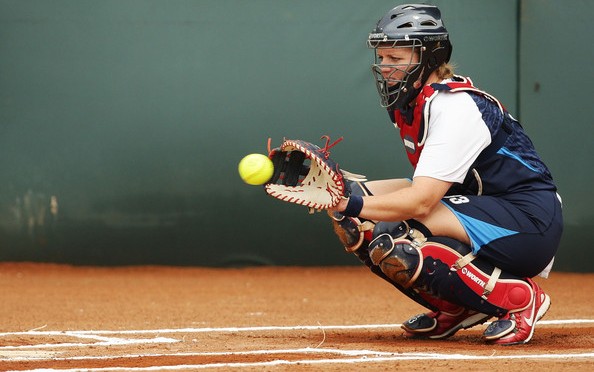
In part one we will take a look at the stance. We truly have to put ourselves in a position to be able to get our feet out from under us and get our knees to the ground. The only thing that can slow us down is our feet, but lets not allow that to happen. We first have to get into a stance that allows you to move your feet quickly when necessary. This stance, again, should be balanced with a strong lower-half and a relaxed upper-half. What this means is your legs should be in a flexed position (strong) and the upper-half of your body (chest, shoulders, arms, wrists, hands) should be in a relaxed state to be able to react quickly. Let’s compare this to our hitting and fielding stances.  How should you feel in your stance? It is very similar to any athletic stance. Flexed lower and Relaxed Upper. Create a rhythm to stay loose, just like in your batting stance. Relaxed muscles are fast muscles!

Stay tuned for more catching tips.

Fundamentals of Hitting

Hitting a softball is not easy if you don’t have the right fundamentals nailed down. Coaches emphasize correct softball hitting fundamentals because they know: for players to be successful at the plate they need to have the fundamentals properly aligned.

If you’re a softball player and want to learn more about the hitting fundamentals of the game here is a quick review of what you need to know:

Fundamentals of Batting

Quick Hints And Drills—Coach Angela Long

Knees inside feet
60-40 wt distribution
Two eye look
Soft arms; bat more in fingers
Step to hit/feet together stride then hit drill/out front tees
Soft stride-pillow-ball of big toe-slightly closed
Contact-palm up palm down/stop the bat to prevent roll
Hit vs firm front side
Short to it long through it—big zone drill-long tee
Good hitters take pitchers in their legs!!!!!! High tees drill
Hands inside the ball-back toss/fence drill/throwing drills/inhibitor drills.
Trigger drills-step back-walk up-tap drills-fungo self toss
Ball on heel to check wt transfer
Mound tee and mound toss as well as double tee drill for uppercutters
Track pitches in bullpen-foot down-hands back-work on load
Bp-other way first/Tony Gwynn 56

Swing Mechanics

  1. Set-up
    Balanced and comfortable athletic position

    1. Lower half of body flexed and balanced
      – Knees slightly bent and weight on balls of feet
      – A square set-up with the feet is preferred for simplicity
    2. Upper half of body tall, level, and square
      – Tall—back relatively straight
      – Level—eyes, head, shoulders, and hips on level plane
      – Arms and elbows relaxed and bent
    3. Grip should be comfortable and tension free with the fingers. Usually with middle knuckles of the top hand in between the middle and large knuckles of the bottom hand
    4. Rhythm and movement—Hitters should have some kind of constant movement in the set-up. Not a stationary position!
  2. Start
    Making a movement away from the pitcher prior to initiating the swing

    1. No start causes premature weight transfer with stride.
    2. Weight remains inside of feet at all times.
    3. Number of ways to get started:
      – Knee cock—front knee moves inward toward back knee
      – Push back—front foot pushes body back
      – Roll back—front side rolls toward back side
      – Hand trigger—back and up
      – Many more ways and combinations
    4. Hands get started with movement back
    5. Getting back early and soon are keys to a good start, which occurs prior to the pitcher’s release point.
    6. General rule—pitcher turns and hitter gets started
  3. Stride separation
    Power position in which to start the bat toward the ball

    1. Stride foot must be down before the swing starts.
    2. Stride should be directly toward the pitcher with the front foot closed.
    3. Direction of the stride helps determine plate coverage
    4. As a general rule, the hitter’s head should move 1/2 the distance of his stride length.
    5. Stride should be against/on a soft front leg with the weight balanced
    6. Bat and hands are in the launch position (4-8 inches back from shoulder) upon stride landing
    7. Hips, shoulder, and head should stay relatively tall, level, and square upon the foot landing
    8. Back leg should be bent (ride it out), not straight (falling off the back side), when the front foot lands
    9. Timing is different for all hitters depending on body type, stride length, stride height, swing path, and bat speed.
  4. Approach
    Hands start the swing down and inside to create a shorter path to the ball but a longer path through the contact areas

    1. Once the stride foot lands, hands and backside of body rotate down through the zone with hips and shoulders relatively level throughout.
    2. Contact is made out in front in relation to the body. Inside pitch is hit farther out in front than the pitch away.
    3. Bottom hand starts the swing and the front arm stays bent until it straightens naturally out in front near contact.
    4. Hands should be “palm up, palm down” at contact with eyes and chin slightly down.
    5. If “on time” contact is made against firm front side with the back leg in an “L” position and balanced.
    6. The swing turns the body, not the body turning the swing.
    7. Let the front side “see the ball” and the back side “hit the ball.”
  5. Finish
    Create length through the hitting zone with extension out front

    1. Finish naturally the swing that was started. Do not try to “help,” “quicken,” or “add power” to the swing by forcing or shortening the finish.
    2. The body should be balanced and relatively level on the finish.
    3. The swing should finish at shoulder level or higher. If you finish below the shoulders, it will signal that you cut the swing off prematurely.
    4. Most swings will end up shoulder height or slightly above. A low finish is usually a sure sign of a swing that has been cut-off prematurely. The head and eyes should be on the contact point throughout contact. To ensure this head position is there long enough, practice leaving head and eyes on the contact point until the swing is completed. Shoulders rotate around the chin during the swing and the chin ends up touching the back shoulder upon completion of the swing.

Welcome to your source for all things women’s softball


Hello and welcome to the new PLAY BALL! blog. I’m so glad you’re here; I hope you find some interesting and helpful information, new ideas, and opportunities to join the conversation! Here’s where you’ll find the latest & greatest news on everything about women’s softball – from cool product updates, tips and drills, information on recruiting to interviews with leaders in women’s softball.


Plus you’ll see PLAY BALL! Athletes in the spotlight with our Student-Athlete star profile.  Along the way, we’ll try to make this blog a touch more interesting to read and allow you to be apart of the conversation.

So bookmark this blog, email to a friend/colleague or add our RSS feed, and let’s pump up the volume on news at PLAY BALL!. And of course, we’d love getting your feedback on PLAY BALL! and this blog — and what you want to see discussed (and showcased) in the future.

Until next time friends…

Angela Long

President/CEO

PLAY BALL!